Christmas in July

Why not join me and get a jump start on your Christmas cards? If we begin now, they might be done by Christmas and we wouldn’t be stressed.

This weeks challenge at Late Night Stampers is a Christmas in July card. My current Christmas paper has not arrived so I used Pink Flamingo designer paper and the nontradional color of Cameo Coral. I really like how the card turned out. Hope you like it too!

Challenge 30

Card Recipe:
Stamps:
Big on Christmas
Cardstock: Old Olive, Cameo Coral, Shimmery White, Real Red, Pink Flamingo DP
Ink: Basic Black, Real Red, Old Olive, Crushed Curry, Soft Suede, Versamark
Accessories: Old Olive ribbon, Top Note die, Clear embossing powder, heat tool, piercing tool

1. Begin by folding 5 1/2″ x 8 1/2″ Old Olive in half. Layer 4″ x 5 1/4″ Cameo Coral and 3 7/8″ x 5 1/8″ Pink Flamingo DP. Pierce corners and mount to card base with dimensionals.

2. Die cut one Shimmery White and Real Red Top Note die. Trim white edge of Shimmery White top note. Attach 1 1/4″ x 4 3/8″ Pink Flamingo DP to the bottom of Shimmery White and trim. Attach 3/16″ x 4 3/8″ Real Red strip at seam and trim. Attach to Real Red Top Note.

3. Stamp “Happy Holidays” in Basic Black and watercolor in Old Olive, Real Red, Crushed Curry, Soft Suede. Color text using Versamark pen, cover with clear embossing powder, and heat. Wrap top note die in Old Olive ribbon and tie bow. Attach finished piece to card base centered.

Hope you have a wonderful day!

Dacia Smith

Blog Tour Patterns

Today’s share is the card and pencil box directions. We’ll begin with the card.

CARD DIRECTIONS

1. Fold 4 1/4″ x 11″ Pretty in Pink cardstock in half.

2. Cut two pieces of contrasting Razzleberry Lemonade designer paper 4 1/4″ x 2 1/2″ and 4 1/4″ x 1″.

3. Cut 6 Pretty in Pink and 5 Melon Mambo word window punches. Attach them to the backside of 4 1/4″ x 2 1/2″ designer paper 7/8″ from the top edge. Attach (2) 3/16″ x 4 1/4″ pieces of scrap cardstock to backside of word window punches. The first is at the top edge of designer paper and the other 1/4″ from the end. Score across backside of word window punches at 11/16″ and 15/16″. Fold to make awning.

3. Cut 4 1/4″ x 1″ Rich Razzleberry cardstock and scallop 4 1/4″ side.

4. Attach 4 1/4″ x 2 1/2″ designer paper to backside of top edge of scalloped piece. Attach 4 1/4″ x 1″ designer paper to backside of bottom edge of scalloped piece. Wrap Melon Mambo ribbon at top edge of scalloped piece and tie knot. Attach finished piece to card base 1 1/4″ from the bottom.

5. Stamp platter in Pretty in Pink and sentiment in Melon Mambo on 2″ x 3 3/4″ piece of Shimmery White cardstock. Color cupcake stamp using Pretty in Pink and Rich Razzleberry markers. Stamp on Shimmery White scrap. Trim leaving white with paper snips. Attach above sentiment with dimensional. Color cherry stamp with Chocolate Chip and Melon Mambo marker. Stamp on Shimmery White scrap and trim with paper snips. Attach to the top of cupcake.

6. Layer Shimmery White cardstock to 2 1/8″ x 3 7/8″ piece of Rich Razzleberry cardstock. Attach finished piece to card base 3/8″ from the left side and 1/2″ from the bottom.

PENCIL BOX DIRECTIONS

The pencil box can be used for so many purposes. With school about to start, this would make a great gift. The pattern can be printed directly to the backside of your cardstock, cut and assembled. Cut the black lines and score the red ones. The directions for assembling are printed directly on the pattern. If you have any questions just ask. I am happy to help you.

As for decorating…

1. Before assembling the top, cut 3/4″ x 3 1/4″ Rich Razzleberry cardstock. Scallop 3 1/4″ side. Attach to backside of top’s bottom edge. Cut 1/2″ x 3 1/4″ of Razzleberry Lemonade designer paper and attach to frontside of top’s bottom edge. Score top and assemble.

2. Assemble box bottom, and cut (2) 1/2″ x 1 3/16″ pieces of Razzleberry Lemonade designer paper. Stamp sentiment in Rich Razzleberry on 1 3/6″ x 1 1/2″ Shimmery White cardstock. Attach designer paper, Shimmery White cardstock, and designer paper on box bottom beginning 1/2″ from the top.

3. Wrap box with Melon Mambo ribbon at the bottom edge of designer paper. Color stamp with Pretty in Pink and Rich Razzleberry marker and stamp scrap of Shimmery White cardstock. Cover with Tombow adhesive and sprinkle with Dazzling Diamonds. Punch hole in top left corner with piercing tool. Thread hole with Linen thread and tie to Melon Mambo bow. Fill box with 4 pencils of your choice.

Hope you find the instructions helpful. The three items would make a great party planning class. Check back often or consider following my blog for more helpful ideas.

Hope you have a great day and happy stamping!

Dacia Smith

Cupcake Holder Instructions

I’m glad everyone enjoyed the Blog Tour. I hope you were able to secure several ideas for upcoming workshops and classes. The links are gone, but you can access each participating blog through the Tour Home page links.

Congratulations! The winner of the July kit is post number 17 – Kathy White! Look for your kit to be emailed today. Not a winner, no need to be sad, the kit can be yours. Access the link here.

July 2009 Kit

July 2009 Kit

Today’s post will include the directions for the cupcake holder. All of the projects were lots of fun. You will enjoy creating them from the easy to follow patterns available for printing. The cupcake holder was created from one sheet of Pretty in Pink cardstock. Please access the pattern here. The directions for decorating the sample are as follows:

1. Cut 3/4″ x 12″ piece of Razzleberry Lemonade designer paper. Score each end at 3/4″. Apply snail adhesive and place scored line on corner and wrap holder. Cut 3/4″ x 3 1/2″ piece of Razzleberry Lemonade designer paper and attach to fourth side of holder overlapping scored ends.

2. Cut 5/8″ x 11″ strip of Rich Razzleberry. Scallop 11″ side. Attach to top edge of Razzleberry Lemonade designer paper. Cut 5/8″ x 3 1/2″ strip of Rich Razzleberry. Scallop 3 1/2″ side and attach to fourth side of holder.

3. Punch 1 3/8″ Crushed Curry Circle. Attach to right side of holder with dimensionals.

4. Color cupcake stamp with Rich Razzleberry and Melon Mambo markers. Stamp onto Shimmery White cardstock. Trim leaving white border with paper snips. Apply 2 way glue to Melon Mambo icing and sprinkle with dazzling diamonds. Attach to left side of Crushed Curry circle with dimensionals.

5. Color candle stamp with Rich Razzleberry and Crushed Curry. Stamp onto Shimmery White cardstock. Repeat twice. Trim each candle leaving white border with paper snips. Attach to icing with small glue dot. Apply Crystal Effects to flame.

6. Tie knot in Melon Mambo ribbon and trim ends. Apply to bottom right corner of cupcake with glue dot.

The cupcake pick was created by scalloping a 1 7/16″ x 1 9/16″ piece of Rich Razzleberry cardstock. Begin with full scallop at each end of the 1 9/16″ side. There should be 3 scallops on each side and 4 scallops across the top and bottom. Stamp sentiment on Shimmery White with Melon Mambo and Rich Razzleberry. Cut out Melon Mambo stamped piece at 1″ x 1 5/16″, rounding corners. Cut out the word “you” from the Rich Razzleberry stamped piece and attach over Melon Mambo using dimensional. Color cherry stamp with Chocolate Chip and Melon Mambo markers. Stamp onto Shimmery White cardstock. Trim with paper snips and apply to right side of sentiment. Attach large glue dot to backside of finished piece. Place tip of toothpick into glue dot, and attach scalloped Rich Razzleberry centered to back. Wrap Melon Mambo ribbon around toothpick and tie in knot. Trim ends. Apply Crystal Effects to the cherry.

Stay tuned, tomorrows post will include the card and pencil box. Hope you have a wonderful day!

Dacia Smith

Royal Blog Tour

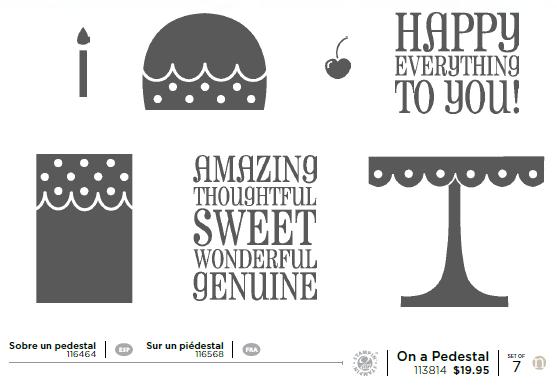
Welcome to the Late Nite Stampers Royal Blog Tour. We are so glad you have decided to join us for this inspirational tour of the 2009-2010 Idea Book and Catalog. You are in for a real treat! The set featured here today is “On a Pedestal”. It is new to the line, and would make a great “Birthday” addition to your collection. The set and pricing are as follows:

Stamp Set

Hope you are ready to celebrate! My projects today are for a girl’s birthday party. It’s not really a party without a little cake and ice cream. How about your own cupcake served up in style? There’s just something about packaging that just “takes the cake”!

Cupcake.Pick

Project Recipe:
Stamps: On a Pedestal
Cardstock: Pretty in Pink, Rich Razzleberry, Crushed Curry, Shimmery White, Raspberry Lemonade DP
Ink: Melon Mambo, Rich Razzleberry, Crushed Curry, Chocolate Chip
Accessories: Melon Mambo ribbon, Scallop & 1 3/8” Punches, Dazzling Diamonds, Crystal Effects, Paper Snips, Dimensionals

My second project was found window shopping on a warm sunny afternoon stroll. There is nothing like the shade of a little striped awning to beat the heat. The cupcake came straight from the little bakery shop window. A coordinating birthday card is a girl’s delight complete with a “cherry on top”.

Card

Card Recipe:
Stamps: On a Pedestal
Cardstock: Pretty in Pink, Rich Razzleberry, Melon Mambo, Shimmery White, Razzleberry Lemonade DP
Ink: Pretty in Pink, Melon Mambo, Rich Razzleberry, Chocolate Chip
Accessories: Melon Mambo ribbon, Scallop & Word Window Punches, Dazzling Diamonds, Paper Snips, Dimensionals

To complete the birthday ensemble the final project is a pencil box favor. What a nice way to say thank you to each party guest! This one will come in handy when school’s back in session.

Favor Closed

Project Recipe:
Stamps: On a Pedestal
Cardstock: Pretty in Pink, Rich Razzleberry, Shimmery White, Razzleberry Lemonade DP
Ink: Rich Razzleberry, Pretty in Pink, Melon Mambo
Accessories: Melon Mambo ribbon, Linen Thread, Scallop Punch, Stamp-a-ma-Jig

A Birthday Treat

Blog Tour Group

Hope you enjoyed the stop and have been inspired to create something fun today! Please consider registering to follow my blog. As always, reading your comments is the highlight of my day! Don’t forget to enter the drawing by posting your comment. By the way, stop back after the tour! You could be the lucky winner of my July class planner. I’ll also be posting measurements and directions for each project to any interested viewers.

Enjoy the ride and happy stamping!

Dacia Smith

Friendship

Friendship is priceless. Some of life’s richest blessings lie in our relationships with each other. Today I’m experiencing an overwhelming sense of thankfulness for all of my friendships. This share is in worship to my greatest friend, Christ!

True Friend

Instructions and details were created and available FREE here.  It is a case of this beautiful card created by Beate.  Hope it blesses you today! True Friend Inside

Celebrating life,

Dacia Smith

Simple Elegance

Simple elegant describes this one today. It was a card that took me 15 minutes to create. It doesn’t get much better. This one would make a great workshop card and give you another reason to buy the Big Shot. That handy tool makes creating so easy and fun! My inspiration was found spending time with my friend, Katya from Belarus working on her wedding album. We used this down the side of several pages yesterday.

The blog tour is in just a couple of days. There will be so many great projects and ideas floating around. I’ve got my sketch book ready and can hardly wait! How about you?

The challenge this week at Late Night Stampers was to create a card using Black and Pink. One more task completed and marked off my list. I’m finally catching up a bit. Well here’s my share…

Challenge 29

Card Recipe:
Stamps: Teeny Tiny Wishes
Cardstock: Shimmery White, Basic Black, Pretty in Pink
Ink: Versamark
Accessories: Pretty in Pink ribbon, Black Embossing Powder, Heat Tool, Swirly Decorative Strip die

1. Fold 5 1/2″ x 8 1/2″ Shimmery White cardstock in half.
2. Cut 2″ x 6″ strip of Basic Black and Pretty in Pink. Apply adhesive to back of pink, layer, and run through the Big Shot.
3. Remove the black and pink from the right side. Remove the pink from the left side.
4. Trim the cardstock flush with the card base. Wrap the left side with Pretty in Pink ribbon and tie.
5. Stamp sentiment in right corner using Versamark, sprinkle with Black embossing powder, and heat.
6. Apply layered piece to the left side of card flush on the top, bottom, and left side.
7. Congratulations you are finished!

Hope you have a great afternoon!

Dacia Smith

In Style Notes

At the Stampin’ Sistas club meeting this month we made a little designer notebook that will slip right into your purse. You will always have paper and a pen handy with this one. I’m sharing the photo with you today. If you are interested in directions please leave me a comment with your email address and I will be happy to forward to you.

Sharing with friends is so much fun. Speaking of sharing, the blog tour is less than a week away. I’m featuring the stamp set “On A Pedestal”. There are some great sample shares coming so stay tuned. My July kit is finished, and I will be posting it this week. Register to follow my blog during the tour and you may take home the July kit free!

Notebook

Project Recipe:
Stamps: Petal Pizzazz
Cardstock: Soft Suede, Bermuda Bay, Shimmery White, Thoroughly Modern DP
Ink: Soft Suede, Bermuda Bay
Accessories: Chocolate Chip Ribbon, Jumbo Brads, Rhinestone Brads, Crop-A-Dile, Paper Snips, Sticky Tape

Hope your week is grand!

Dacia Smith

Anything but A2

Challenge 28 this week at Late Nite Stampers was to create a card any size except an A2. Most of my cards are A2, so this was a challenge for me. It has also been a very busy week. This one came in just under the wire. Hope someone will find the last minute entry inspiring. The card followed a sketch challenge I tried recently that was really easy to work with. This one was also used for an in color stamp class this week. Well here it is…

Challenge 28

Card Recipe:
Stamps: Trendy Trees, Happy Everything
Cardstock: Dusty Durango, Soft Suede, Crushed Curry, Whisper White
Ink: Soft Suede, Crushed Curry
Accessories: Crushed Curry Ribbon, Stamp-a-ma-Jig
Happy Stamping,
Dacia Smith

A Wedding Challenge

The bicycle trip down the creeper trail was awesome! We had a great time and the weatPoochher was perfect. It is a wonderful activity any family would enjoy. The highlight of the day was an introduction to a jet set pooch flying down the trail. Isn’t he just the cutest?

The challenge this week is a wedding, shower or anniversary card. There were several anniversary cards in my stash so I decided to create one for a wedding. The new in colors are packed with a bright and cheery attitude. What a great way to begin a new life together.

Challenge 27

 1. Begin by folding 4 1/4″ x 11″ textured Bermuda Bay cardstock in half.

2. Layer 3 1/4″ x 4 1/8″ Soft Suede, 3 1/8″ x 4″ Thoroughly Modern DP.

3. Punch 2 Curly Labels from Bermuda Bay cardstock and layer with 1 1/4″ x 2 3/8″ Whisper White.   Pierce holes around outer edge.

4. Punch Modern Label from Bermuda Bay and layer with Whisper White Word Window punch.

5. Stamp sentiment in Melon Mambo, set Pretty in Pink brads, and attach to bottom of layered piece.

6. Stamp hearts in Melon Mambo on Whisper White, Soft Suede and Melon Mambo. Cut out with paper snips and layer. Attach to layer piece with dimensionals.

7. Wrap Melon Mambo ribbon around card and tie.

Card Recipe:
Stamps: Teeny Tiny Wishes, The More the Merrier
Cardstock: Bermuda Bay Textured, Soft Suede, Bermuda Bay, Whisper White, Thoroughly Modern DP
Ink: Melon Mambo
Accessories: Melon Mambo Ribbon, Curly Label, Modern Label, and Word Window punches, Soft Subtles Brads, Paper Snips, Piercing Tool, dimensionals.
Hope your evening is grand!
Dacia Smith

Black and White

My family and I are headed to the Creeper Trail in Virginia today. We are riding bicycles down a mountain. We have packed a picnic lunch and plenty of water. Hope to enjoy a great time together. Maybe I’ll share some pictures tomorrow.

The card share today was created for a Workshop last week featuring the Fresh Cuts stamp set and the embossing technique. We had a great time and the card was easy to do. At first glance it appeared to be a framed piece of art. The effect was created using the layering technique and varying the widths of paper. Hope you like it!

Black and White

Card Recipe:
Stamps: Fresh Cuts
Cardstock: Basic Black, Whisper White
Ink: Black Craft, Old Olive, Rose Red
Accessories: Black Ribbon, Hodge Podge Hardware, Aqua Painter, Black Embossing Powder, Heat Tool

Have a great holiday weekend!

Dacia Smith