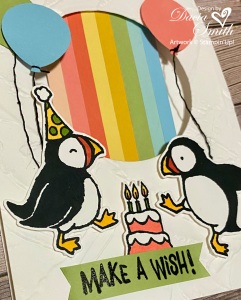
Today’s share was inspired by a live video with Artisan Chloe Evans of Australia yesterday. She is awesome and we had so much fun learning to make the rainbow slider card technique. This is my first attempt at it, but I assure you it won’t be my last. I’ve had the Party Puffins stamp set on my craft table for a couple of days and I’ve been itching to ink it up. So what do you think? Ready to give it a go? The challenge this week over at TGIF is a peek a boo window so I entered this one for TGISC321.
I began with a full sheet of Thick Basic White card stock. I cut one 4 1/4″ x 11 and two 4 1/4″ x 5 1/2″ pieces from the full sheet. After scoring the 4 1/4″ x 11″ at 5 1/2″ I folded and then die cut the second largest circle from the Layering Circles Dies at the top center. I lined up the two pieces of 4 1/4″ x 5 1/2″ card stock one at a time to the card front and die cut a hole in each to match the card front.
I embossed the first 4 1/4″ x 5 1/2″ card using the Painted Texture 3D Folder and attached it to the card front using Tombow Multi Purpose Adhesive. I then pulled out Party Puffins and stamped the puffins, birthday cake and greeting using my Stamparatus. It’s so easy to get a solid black image because you can stamp them several times with a perfect line up each time. My Paper Snips came in handy for fussy cutting out the pieces after I colored them with my Blends. The balloons were punched with the recently retired balloon punch and I tied the strings to each using the Basic Black Baker’s Twine from the Essentials Pack.
The slider was made by beginning with a 2″ x 8 1/2″ piece of Basic White card stock scored at 1/2″ along the 2″ side and applying eight 1/4″ x 8 1/2″ strips of card stock butted against the fold. My rainbow includes Petal Pink, Flirty Flamingo, Calypso Coral, So Saffron, Bumblebee, Pear Pizzazz, Pool Party and Balmy Blue. I wanted a pastel pallet but you could use any of our over 50 colors of card stock to create your rainbow. The finished strip is attached to the backside of the card front by applying adhesive on the 1/2″ x 2″ folded edge and attaching it flush against the 5 1/2″ fold in the middle (see inside photo). I centered the strip in the window opening.
Lower the rainbow strip over the inside and attach a 1/4″ x 1 1/2″ strip of Basic White card stock to the inside at the right and left side of the rainbow strip. There should be a 1/8″ space between the Basic White strip and the rainbow strip on each side. These strips of Basic White card stock are to keep the slider mechanism moving smoothly up and down. Next you thread the rainbow slider through the hole of the second 4 1/4″ x 5 1/2″ piece of Basic White card stock and attach it to the inside card base only at the sides and top of the Basic White strips. The center needs to be free of adhesive so your rainbow can freely slide up and down when the card is opened. With the card closed, trim off the excess rainbow strips flush at the card bottom.
With the card fully open the last step is to stamp the hidden greeting on the rainbow strip. I used my Stamparatus to position the greeting just above the bottom edge of the circle and centered right to left across the rainbow. With the magnets securely in place I could always stamp it a second time if I didn’t get good coverage the first. There’s plenty of room under the circle for decorating or an additional hand written message.
I hope you enjoyed this fun fold rainbow slider card and will give it a try. If you have any questions just reach out, I’m happy to help!
If you are in need of supplies and live in the United States…
I’d love to be your Stampin’ Up demonstrator!
You can order your supplies from my online store here. Looking forward to connecting with you soon.
Happy stamping,
Dacia Smith


This is a super fun card! Thanks for sharing.
Oh how totally adorable! I love the rainbow window to highlight the puffins. Way to rock the challenge from TGIF. Smiles, Elizabeth